


The bicycle bottom bracket is that assembly of parts which ensures the rotation of the central shaft connected to the cranks. It consists of: a central spindle connected to the two cranks and inserted in two ball bearings (or annular cages with steel balls) located at the ends of the spindle and two threaded lateral supports. Due to both technical evolution and the wide diversification of bicycle types, bottom brackets can have profound structural differences, so the following descriptions are for a standard road bike. The spindle that connects the cranks is installed in the cylindrical tubular housing and is equipped with two circular supports that contain the annular cages with balls. The supports are screwed into the housing and ensure the correct rotation of the spindle. The possibility exists of use and degradation, due to external agents, causing damage to this mechanism. In such cases, noises and squeaks during pedalling, jerking of the pedals, or difficulty in operation can be detected. In such situations, an inspection should be made of the component part and any necessary repair/maintenance work should be carried out.
WHAT YOU’LL NEED
– WD-40 Specialist® Degreaser
– WD-40 Specialist® Grease Spray
– Spanners
– Pliers
– Crank puller
– Cleaning rags
DISASSEMBLING THE CRANKS
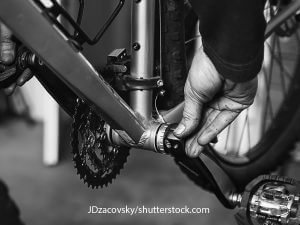
To access the bottom bracket, the cranks must be removed from the spindle. Depending on the type of clamping, the bolts or screws that secure the cranks must be loosened and removed. The crank, however, is firmly mounted on the spindle and is difficult to remove manually. To do this, it will be necessary to use a crank puller, which is screwed into the centre of the crank mount, to pull the crank out. Both cranks must be removed. The left one is connected to the chain sprocket.
LOOSENING THE LATERAL SUPPORTS
The heads of the bottom bracket spindle remain in view. These must be cleaned with a rag before continuing. The bottom bracket is secured in its seat with two supports screwed to the tubular housing and fastened, in turn, by two ring nuts which, when tightened, prevents them from coming loose. First, the two outer rings must be loosened. In many cases these have teeth which can be gripped with an appropriate spanner. In any case, a pipe spanner (the classic ‘parrot’ spanner) is sufficient to loosen and remove them. Then, again with the parrot spanner (or other appropriate spanner), the two bottom bracket supports must be loosened. Depending on the bottom bracket model, the direction of unscrewing rotation may be right or left.
REMOVING THE BOTTOM BRACKET
When the supports have been unscrewed, the bottom bracket can be removed from its seat. It is necessary to check:
- The condition of the bracket threads
- Any possible wear of the spindle heads (where the cranks are fitted)
- The wear on the cage with the balls (out-of-round wear or deformation of the cage is a frequent cause of noise). In some bottom brackets, there are actual ball bearings instead of ball cages. If anomalies or real damage to these parts is detected, the only solution is to completely replace the part with an identical one.
CLEANING THE BOTTOM BRACKET
If the bottom bracket is not particularly damaged, it can be cleaned and lubricated before reassembly. The first operation to be performed is the thorough cleaning of all the component parts of the bottom bracket. In this activity, WD-40 Specialist Degreaser, solvent-based, is particularly useful. It rapidly removes grease, oil and dirt without leaving any residue. It acts immediately on contact. Cleaning must extend inside the bottom bracket housing with particular care for the two threaded ends. Cleaning terminates by carefully wiping all parts with a microfibre cloth.
LUBRICATING THE BOTTOM BRACKET
Before reassembling, all moving parts of the system must be adequately lubricated with particular attention to the threaded areas and the steel ball cages. This can be done by applying a generous amount of WD-40 Specialist Grease Spray rich in high-performance additive grease to all these parts. It provides extremely long-lasting lubrication and corrosion protection for the most critical situations. It does not drip and has excellent adhesion and sealing properties. It is also water-resistant. It must also be applied to the threads inside the bottom bracket housing.
FITTING THE BOTTOM BRACKET BACK ON
When everything is well lubricated and greased, the bottom bracket can be fitted back into its housing, repositioning the two lateral supports by screwing them in. These must be tightened until the only movement of the bottom bracket is rotary and there is no transverse play. The two ring nuts, which act as locking elements, are then screwed onto the supports. Finally, the cranks are inserted and the locking elements are fitted back on.
To follow all the news of WD-40 Africa, follow us on Facebook and Instagram !


